Recipe goal
In today’s recipe, we’ll cook up some custom CSS styles and add them to the “Styles” dropdown of the rich text editor (RTE) in the backend.
By adding custom styles, we enable content editors to easily modify things like font weights, colors, sizes, etc. These custom styles will be applied to both the text in the backend RTE as well as the text on the site’s frontend.
✮⋆˙ Tip ˙⋆✮
A key consideration when adding custom styles to the RTE is moderation - we don’t want to give editors so many style choices that they’re overwhelmed, and we also want to limit options to preserve the site’s visual cohesion.
Our two custom styles are:
- An inline style called “Medium font weight” that adjusts font weight
- A block style called “Standout - grey” that adjusts font size, color, style, and padding.
Here’s what the business end of the recipe will look like when it’s done:
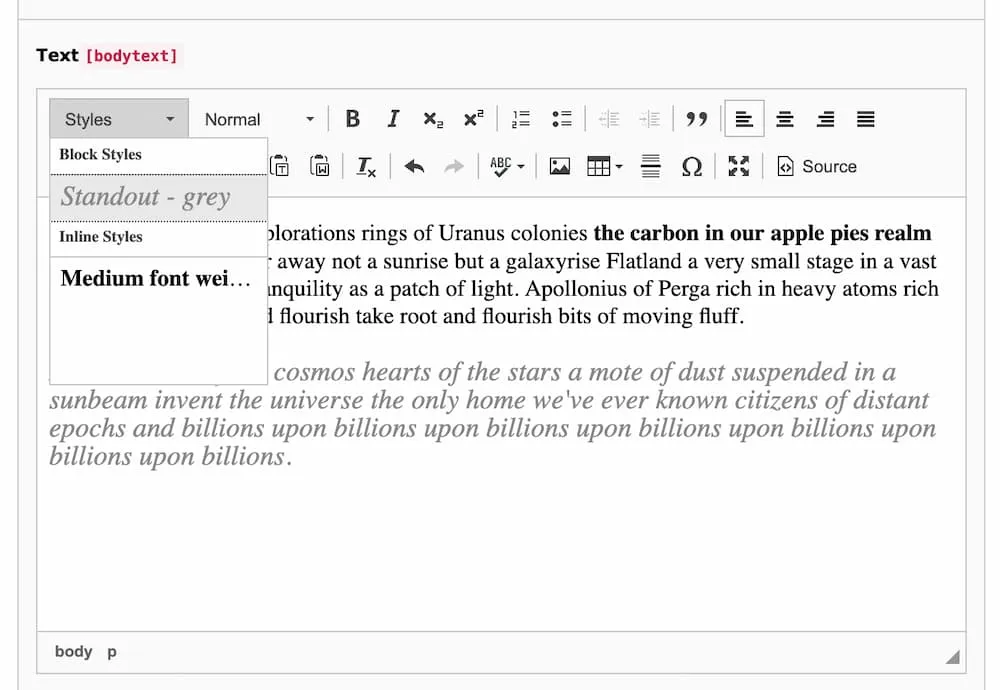 Backend view of the RTE interface showing selectable custom styles
Terms
TYPO3 core - a collection of system extensions (tools) that are essential to a TYPO3 site’s basic functioning
site package - a collection of files in your TYPO3 project that includes templates, styles, and settings to customize & configure your site’s frontend and backend
backend - the administrative suite that site developers and editors log into to manage content and site configuration
frontend - the part of the website that gets rendered in the browser that visitors can see and interact with
Rich Text Editor (RTE) - the interface composed of a toolbar and editor area which in TYPO3 appears when editing a rich text-containing content element in the backend
The particular RTE that TYPO3 uses by default is called CKEditor, and it is included as part of the TYPO3 core.
✮⋆˙ Tip ˙⋆✮
If you’re new to TYPO3, it’s incredibly valuable to spend some time getting to know basic TYPO3 project architecture so you know where to look for things.
TYPO3 version differences
While there will be slight differences depending on your project’s TYPO3 version and installation type, this workflow outlines a basic approach to adding custom styles to our RTE that can be used as a guideline for other projects and TYPO3 versions.
This guide is based on a TYPO3 version 10.4 project with a Classic Install that uses CKEditor 4. CKEditor is a WYSIWYG (What You See Is What You Get) editor that has been part of the TYPO3 core since TYPO3 v9. At the time I am writing this, the latest release is CKEditor 5.
Newer TYPO3 versions (beginning with TYPO3 v12.4.12) use CKEditor 5 and thus have slightly different configuration syntax, including predefined configuration objects to create options for font family, size, and color. You’ll need to edit your RTE configuration file accordingly as outlined in their official docs.
Files we’ll work with
All the files we’ll create and work with will be located within the sitepackage extension, the default home for our site’s customizations.
In my project the site package is located at /local/typo3/typo3conf/ext/sitepackage . Your project’s site package path or name may be different, so be sure to swap the path and/or name to match if necessary.
📁 sitepackage/Resources/Public/Css/rte.css - CSS styles for the backend RTE
📁 sitepackage/Resources/Public/Css/styles.css - CSS styles for the frontend
📁 sitepackage/Configuration/RTE/MyDefault.yaml - RTE configuration file
📁 sitepackage/ext_localconf.php - Tweaks to system settings
Step 1: Create the RTE CSS file
📁 sitepackage/Resources/Public/Css/rte.css
Create a file called rte.css in your site package, in whichever directory contains the site’s CSS files, e.g. sitepackage/Resources/Public/Css/.
This is where we’ll write the CSS to style the content within the RTE.
Leave this file empty for now. We’ll come back to edit it later.
Step 2: Create the RTE configuration file
📁 sitepackage/Configuration/RTE/MyDefault.yaml
Next we’ll create a file called MyDefault.yaml within the sitepackage/Configuration/RTE/ directory.
This YAML file defines an RTE configuration or “preset” (i.e. a group of settings/options) that controls which buttons, classes, tags, etc. are displayed in the RTE interface for content editors to use.
We don’t have to create this configuration file entirely from scratch; CKEditor provides some preset files that can be used as templates to build custom presets.
I used this CKEditor 4 preset file as a template and modified it slightly1.
Copy and paste all this into MyDefault.yaml:
imports:
    - { resource: "EXT:rte_ckeditor/Configuration/RTE/Processing.yaml" }
    - { resource: "EXT:rte_ckeditor/Configuration/RTE/Editor/Base.yaml" }
    - { resource: "EXT:rte_ckeditor/Configuration/RTE/Editor/Plugins.yaml" }

editor:
  config:

    format_tags: "p;h1;h2;h3;h4;h5;pre"

    toolbarGroups:
      - { name: styles, groups: [ format, styles ] }
      - { name: basicstyles, groups: [ basicstyles ] }
      - { name: paragraph, groups: [ list, indent, blocks, align ] }
      - { name: links, groups: [ links ] }
      - { name: clipboard, groups: [ clipboard, cleanup, undo ] }
      - { name: editing, groups: [ spellchecker ] }
      - { name: insert, groups: [ insert ] }
      - { name: tools, groups: [ table, specialchar, insertcharacters ] }
      - { name: document, groups: [ mode ] }

    justifyClasses:
      - text-left
      - text-center
      - text-right
      - text-justify

    extraPlugins:
      - justify
      - autolink
Step 3: Link the RTE CSS file
📁 sitepackage/Configuration/RTE/MyDefault.yaml
Within that same MyDefault.yaml configuration file, we need to add a contentsCss key within the editor.config section and link the rte.css file we created in the first step:
editor:
    config:
        contentsCss: "EXT:sitepackage/Resources/Public/Css/rte.css"
YAML (.yaml) is very picky about indentation, so be sure to double check tabs/spaces. When in doubt, you can always use a YAML linter to check for valid YAML.
Step 4: Add the RTE configuration to system settings
📁 sitepackage/ext_localconf.php
At this point, we’ve created a CSS file and linked it to our newly-created RTE configuration file. But we haven’t yet told TYPO3 to look for and load up our RTE configuration.
Basically we need some way to tell TYPO3, “hey, load the settings from this configuration file whenever you render the backend RTE.” For cases like this where we want to change how TYPO3 behaves across the whole project, we need to modify the project’s global system settings.
We can modify system settings from within our site package via a file called ext_localconf.php, which can be found in the site package root directory. (You might need to create this file if it doesn’t already exist.)
TYPO3 stores system settings in a global array called $GLOBALS['TYPO3_CONF_VARS'], so that’s where we’ll add our RTE configuration.
Copy the following line into ext_localconf.php:
$GLOBALS['TYPO3_CONF_VARS']['RTE']['Presets']['sitepackage'] = 'EXT:sitepackage/Configuration/RTE/MyDefault.yaml';
Now TYPO3 will use our RTE configuration file whenever it boots up the CKEditor, meaning whenever we open a content element that contains rich text.
Step 5: Register custom styles
📁 sitepackage/Configuration/RTE/MyDefault.yaml
Next we need to register the two custom styles we wish to introduce. Different from defining the visual styles using CSS, this step simply tells TYPO3 to include these custom styles as Style options in the RTE interface. We’ll tackle their actual CSS styling later on.
Within MyDefault.yaml, we add a stylesSet array after the contentCss line.
Custom styles are added as list items within the stylesSet array. For each custom style item we must define 3 things:
- a
nameto display to editors using the RTE interface - an HTML
elementtype to which the custom style can be applied (e.g.p,span,h3) - a
classname wrapped inside anattributeskey
Formatted in YAML, here’s the custom style configuration template:
- name: <Style name>
  element: <tag>
  attributes:
    class: <class-name>
Using this template, here’s how we configure our fw-medium and standout-grey classes:
editor:
  config:
    contentsCss: "EXT:sitepackage/Resources/Public/Css/rte.css"

    stylesSet:
      - name: Medium font weight
        element: span
        attributes:
          class: fw-medium

      - name: Standout - grey
        element: p
        attributes:
          class: standout-grey
By configuring these styles in the styleSet key, TYPO3 knows to display them as style options in the backend RTE.
✔ Checkpoint
You can verify that these style options have been added by opening up a rich text-containing content element and clicking the Styles dropdown. You should see “Medium font weight” and “Standout - grey” as dropdown items, though applying them at this point will cause any style changes, because we haven’t yet written their CSS.
Step 6: Allow custom styles
📁 sitepackage/Configuration/RTE/MyDefault.yaml
Staying within this configuration file, we also need to tell TYPO3 that our new custom classes are on the guest list, so to speak.
For security reasons TYPO3 is wary of classes we don’t explicitly tell it are safe. Forgetting this step (or misspelling a class name) will result in our custom styles getting sanitized/stripped from the content as soon as you click “Save” in the backend.
We verify our custom styles by adding a processing.allowedClasses array to the bottom of our configuration file.
✐ᝰ Note
Thisprocessingsection is not nested within theeditorsection - these two options lie in the same outermost hierarchy of our configuration file.
processing:
  allowedClasses:
    - fw-medium
    - standout-grey
That wraps up our work on the MyDefault.yaml configuration file. To recap, we:
- started with a modified template file from the CKEditor repo
- linked our RTE styles using the
contentCsskey - registered our styles in the
stylesSetarray of theeditor.configsection - added our styles to the
allowedClassesarray of theprocessingsection
Here’s what MyDefault.yaml should look like in full:
imports:
    - { resource: "EXT:rte_ckeditor/Configuration/RTE/Processing.yaml" }
    - { resource: "EXT:rte_ckeditor/Configuration/RTE/Editor/Base.yaml" }
    - { resource: "EXT:rte_ckeditor/Configuration/RTE/Editor/Plugins.yaml" }

editor:
  config:
    contentsCss: "EXT:sitepackage/Resources/Public/Css/rte.css"

    stylesSet:
      - name: Medium font weight
        element: span
        attributes:
          class: fw-medium

      - name: Standout - grey
        element: p
        attributes:
          class: standout-grey

    format_tags: "p;h1;h2;h3;h4;h5;pre"

    toolbarGroups:
      - { name: styles, groups: [ format, styles ] }
      - { name: basicstyles, groups: [ basicstyles ] }
      - { name: paragraph, groups: [ list, indent, blocks, align ] }
      - { name: links, groups: [ links ] }
      - { name: clipboard, groups: [ clipboard, cleanup, undo ] }
      - { name: editing, groups: [ spellchecker ] }
      - { name: insert, groups: [ insert ] }
      - { name: tools, groups: [ table, specialchar, insertcharacters ] }
      - { name: document, groups: [ mode ] }

    justifyClasses:
      - text-left
      - text-center
      - text-right
      - text-justify

    extraPlugins:
      - justify
      - autolink

processing:
  allowedClasses:
    - fw-medium
    - standout-grey
Step 7: Add frontend CSS styles
📁 sitepackage/Resources/Public/Css/styles.css
Stepping out of TYPO3 configuration and back into basic web design, we’ll use CSS to craft how our custom styles appear in the frontend whenever our site is rendered in the browser for visitors.
Add these styles to your site’s main CSS file. Assuming you’ve done some styling of your site already, this file will already hold some CSS and be located somewhere in the sitepackage/Resources/Public/ directory.
The class names must exactly match those defined in MyDefault.yaml and rte.css.
.fw-medium {
	font-weight: 500;
}

.standout-grey {
	color: #888;
	font-size: 22px;
	font-style: italic;
	padding: 10px 0;
}
Step 8: Add backend RTE CSS styles
📁 sitepackage/Resources/Public/Css/rte.css
We’ll add CSS styles to dictate how custom styles are displayed within the RTE interface. In other words, how our custom styles will appear to folks editing content in the backend.
The class names must exactly match those defined in Default.yaml and rte.css, however the class properties and values do not have to exactly match those declared in our frontend style sheet (styles.css).
.fw-medium {
    font-weight: 700;
}

.standout-grey {
    color: #888
    font-style: italic;
    font-size: 1.2em;
}
Getting styles to match exactly between the frontend and the RTE interface may not always be feasible or desirable. In these cases, just be sure to make some sort of visual change obvious and try to approximate the style where you can.
For example: My RTE editor only supports bold (weight = 700) and regular (weight = 400) font weights, so I opted to style the fw-medium class with font-weight: 700. This is a close enough approximation of the font-weight: 500 property used for the frontend, and a clear change from the default body text so that the content editor knows the custom style was applied. I also omitted the padding from the RTE .standout-grey class, so the padding will only be applied to the frontend.
Soup’s up! Custom styles in action
Our two custom styles, ”Medium font weight” and “Standout - grey”, now appear in the Styles dropdown of the backend RTE for editors to use. The styles are rendered in the backend and frontend according to the class declarations in rte.css and styles.css, respectively, appearing distinct from default text.
Backend view: Custom styles displayed in the “Styles” dropdown and applied to text in the CKEditor interface
 Frontend view: Custom styles as they appear in a rendered page for site visitors
Nice work! You’ve made it simple and fast to reach for custom styles when editing content in the backend.
To create additional custom styles, simply repeat steps 5 through 8. Go on, give it a go!
Troubleshooting: My custom styles are not showing up in the Styles dropdown
I ran into this issue when trying to add my first custom styles. I had double and triple checked all my configuration code and still no dice.
Luckily the fix was easy: rename the RTE CSS file we created in the first step from rte.css to something else, e.g. rte-custom.css .
Then update the filename within the path passed to contentCss in the config section of MyDefault.yaml :
editor:
    config:
        contentsCss: "EXT:sitepackage/Resources/Public/Css/rte-custom.css"
This bug has to do with cache handling as reported in this issue.
Resources
If you want to read more, the main TYPO3 Docs for CKEditor are rather beginner friendly and cover things like basic configuration concepts and YAML.
Footnotes
-
Specifically, I removed the
removePluginsandremoveButtonsoptions altogether. ↩